How to Tighten a Wobbly Faucet: Step-by-Step Guide
浏览次数:225 分类:Blogs

A wobbly faucet may seem like a small annoyance, but if left unfixed, it can turn into a bigger problem—causing leaks, damaging your countertop, and even wearing out plumbing connections. Luckily, tightening a loose faucet is a straightforward job that you can handle yourself with a few basic tools and a little patience.
In this guide, you’ll learn why faucets become loose, what tools you need, and how to fix the problem step-by-step. Whether you’re dealing with a kitchen sink faucet or a bathroom fixture, the process is similar.
Why Do Faucets Become Wobbly?
A faucet is secured to the sink or countertop with nuts and mounting brackets underneath. Over time, these connections can loosen due to:
-
Regular use: Pulling, swiveling, and bumping the faucet during daily tasks
-
Vibration: Caused by running water and pipe movement
-
Improper installation: Bolts or brackets may not have been tightened enough initially
-
Worn-out parts: Old washers or brackets can degrade
-
Sink material movement: Especially with wood or composite countertops that can expand or contract
Understanding the cause helps you prevent the issue from recurring after you fix it.
Tools and Materials You’ll Need
Before you crawl under the sink, gather the following:
-
Adjustable wrench or basin wrench (designed for tight spaces)
-
Flashlight or work light
-
Towels or bucket (in case of drips)
-
Screwdriver (Phillips or flathead, depending on your faucet)
-
Plumber’s tape (optional, for extra grip on threads)
-
Replacement mounting hardware (only if existing parts are damaged)
Safety First: Shut Off the Water Supply
Even though you’re not removing water lines for this fix, it’s good practice to shut off the water valves under the sink. This avoids surprises if you accidentally loosen a supply connection. Turn both hot and cold valves clockwise until they stop.
Step-by-Step: How to Tighten a Wobbly Faucet
1. Clear the Space Under the Sink
You’ll be working in a cramped position, so remove any cleaning supplies or stored items. Lay down a towel to cushion your back and catch any drips.
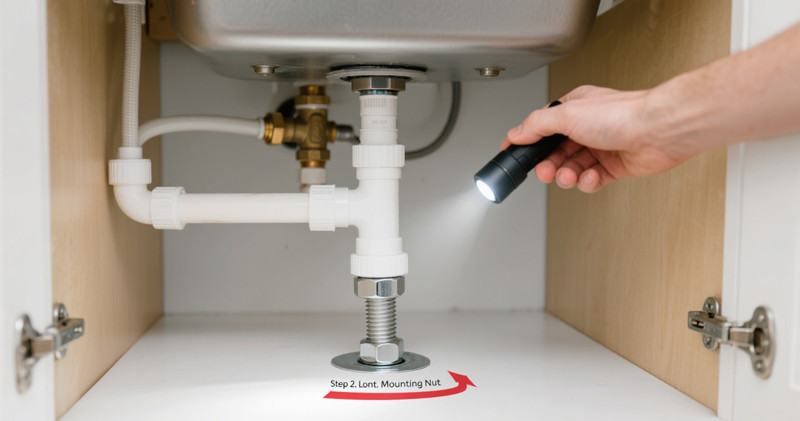
2. Locate the Mounting Nuts
Look directly under the faucet body. You should see one or two mounting nuts securing the faucet to the sink or countertop. These may be plastic, metal, or brass, and sometimes have a bracket or washer between the nut and sink.
If your faucet is a single-handle kitchen model, you might find a large U-shaped bracket that holds it in place. For widespread bathroom faucets, each handle and the spout may have its own mounting hardware.
3. Use the Right Wrench
This is where a basin wrench shines—it’s a long-handled tool with a swiveling jaw, perfect for reaching up behind sinks in tight quarters. If the space is more open, a standard adjustable wrench may work.
4. Tighten the Mounting Nuts
Turn the nut clockwise to tighten. Apply firm, steady pressure, but don’t overdo it—overtightening can crack a porcelain sink or damage the faucet base.
Tip: If the nut spins without tightening, the threads may be stripped, or the bracket might be warped. In that case, you’ll need to replace the hardware.
5. Check for Additional Screws or Brackets
Some faucets have set screws on the base, hidden behind decorative caps. Pop off the cap with a small flathead screwdriver, tighten the screw, and replace the cap.
6. Inspect the Gasket or Seal
A rubber or plastic gasket sits between the faucet base and the sink to prevent movement and leaks. If it’s worn out or missing, tightening alone won’t solve the problem—you’ll need to replace it.
7. Reconnect and Test
Once the faucet is secure, turn the water supply valves back on. Gently move the faucet from side to side to check stability. Run water and watch for leaks under the sink.
Troubleshooting: When Tightening Isn’t Enough
Sometimes tightening the mounting nut doesn’t fully solve the wobble. Here’s what might be happening:
-
Corroded threads: If the nut or bolt is rusted, replace it.
-
Damaged sink deck: If the mounting area is warped or cracked, you may need to reinforce it with a sink repair plate.
-
Loose supply lines: Wobbling can also be caused by water lines pulling on the faucet—secure them with clips or straps.
-
Faulty design: Some cheap faucets simply have weak mounting systems; in that case, upgrading to a better model may be the long-term fix.
Preventing Future Faucet Wobble
To keep your faucet rock-solid:
-
Avoid excessive force when using the handle or spout.
-
Periodically check the tightness of mounting nuts every 6–12 months.
-
Address leaks immediately—water under the sink can cause parts to loosen faster.
-
Use the right faucet for your sink—heavy commercial-style faucets need strong mounting brackets.
When to Call a Plumber
If the wobble is due to:
-
Cracked sink or countertop
-
Severely corroded mounting bolts
-
Hidden leaks that you can’t identify
…then calling a professional is the safest choice. A plumber can also re-seat the faucet and replace any worn-out parts, ensuring a long-lasting repair.
Final Thoughts
A wobbly faucet is more than just a nuisance—it’s a warning sign that something’s loose and could lead to leaks or damage if ignored. Fortunately, with the right tools and a bit of time, you can tighten a faucet and restore it to solid working order.
By following the steps in this guide—clearing your workspace, identifying the mounting nuts, using the right wrench, and checking seals—you’ll not only fix the problem but also extend the life of your faucet. A secure faucet makes for a cleaner, safer, and more pleasant kitchen or bathroom experience.
So, next time your faucet starts to wiggle, don’t wait until it’s spraying water everywhere. Grab your wrench, tighten it up, and enjoy the satisfaction of a job well done.
 Kes Faucets


您好!请登录