 Kes Faucets








How to Install a Tub Spout Extension: The Complete DIY Guide for 2026
浏览次数:240 分类:Install
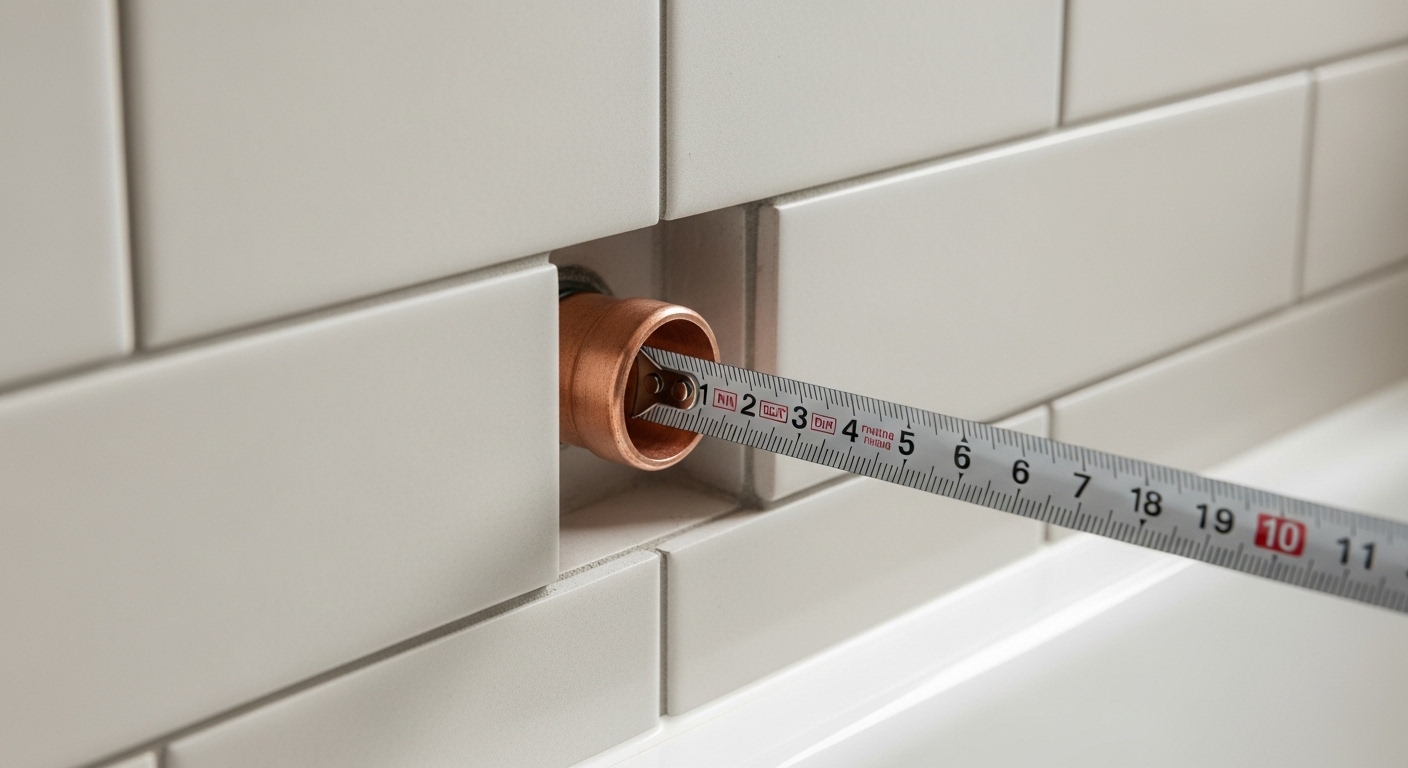
If you’ve ever stared at your bathtub wondering why your spout sticks out so far — or worse, doesn’t reach past the wall at all — you’ve landed in the right place. Learning how to install a tub spout extension solves one of the most common post-remodel headaches in American bathrooms: the recessed plumbing stub that no longer matches your newly tiled or paneled wall. Whether your contractor left the copper pipe too short, you just retiled and added 1/2 inch of thickness, or you swapped out a hardware-store spout for a designer model that needs different reach, an extension nipple bridges that gap cleanly and prevents water from spraying behind the wall. In this guide, we’ll walk through every step, every tool, and every common mistake — from measuring the existing copper to torquing the new spout snug without cracking a tile.
Why You Might Need to Install a Tub Spout Extension
Before we dive into how to install a tub spout extension, it helps to understand why these little brass nipples exist in the first place. Plumbers rough in the tub valve and copper stub-out long before the finished wall goes up. If you later add cement board, thicker tile, a stone slab, or a shower surround panel, the pipe that was once flush may now sit 1/2 inch to 1-1/2 inches behind the wall. A standard tub spout simply won’t reach — or if it does, it won’t sit tight against the surface, leaving a gap that funnels water straight into your wall cavity.
Common scenarios where an extension becomes essential:
- The original copper pipe was cut too short during rough-in.
- A tile renovation added wall thickness the plumber didn’t anticipate.
- You’re upgrading from a slip-on style spout to a threaded model (or vice versa).
- The new designer spout requires a longer or shorter nipple to seat correctly.
- You hear water dripping inside the wall after a shower — a telltale sign of a poorly seated spout.
Tub Spout Types: Slip-On vs. Threaded (And Why It Matters)
Before buying any extension, identify what kind of tub spout you currently have or plan to install. The connection style determines which extension kit you need.
| Spout Type | Connection | Best For | Difficulty | Typical Cost |
|---|---|---|---|---|
| Slip-On (Set-Screw) | Slides over 1/2″ copper, secured with hex screw | Copper stub-outs cut flush or just past the wall | Easy | $12–$35 |
| Threaded (IPS) | Screws onto 1/2″ NPT brass nipple | Galvanized or threaded brass stub-outs | Easy–Moderate | $15–$50 |
| Universal (Adapter Kit) | Includes both slip-on and threaded fittings | Unknown or mixed plumbing | Easy | $20–$45 |
| Diverter Spout w/ Extension | Built-in pull-up diverter, often threaded | Combo tub/shower with handheld diverter | Moderate | $35–$80 |
If you’re not sure which style you have, look underneath your current spout for a small hex screw. If you see one, it’s slip-on. If the spout simply unscrews counterclockwise like a stubborn jar lid, it’s threaded. For more help matching parts to your existing plumbing, our guide on how to check faucet compatibility before buying walks through measurements and stub-out identification in detail.
Tools and Materials You’ll Need
One of the best parts of learning how to install a tub spout extension is that you don’t need specialty plumbing tools. Most homeowners already own everything required.
- Tub spout extension kit (1/2″ brass nipple, typically 1″, 1-1/2″, 2″, or adjustable)
- Replacement tub spout (if upgrading)
- Adjustable wrench or strap wrench
- Hex (Allen) key — typically 1/8″ for slip-on spouts
- PTFE thread seal tape (Teflon tape, white or pink/heavy-duty)
- 100% silicone caulk (clear or color-matched)
- Clean rag and old toothbrush
- Flashlight or headlamp
- Painter’s tape (to protect surrounding tile)
- Measuring tape or ruler
How to Install a Tub Spout Extension: Step-by-Step
The core process for how to install a tub spout extension is the same whether you’re working with copper or threaded brass — just adapt the connection method. Read through every step before you start so you understand the sequence.
Step 1: Shut Off the Water (Yes, Really)
Even though you’re not opening the valve itself, you’ll want the water off so any residual pressure doesn’t squirt while you work. Shut off the supply at the dedicated tub valve, the bathroom branch line, or the main if those aren’t accessible. Open the tub faucet to relieve any trapped pressure, then close it.
Step 2: Remove the Old Tub Spout
For slip-on spouts, look under the spout for the set screw. Loosen it with the hex key (don’t unscrew it all the way — they’re tiny and love to vanish down the drain). Then pull the spout straight off the copper pipe. If it’s stuck from years of mineral buildup, twist gently while pulling. For threaded spouts, wrap a rag around the body to protect the finish and rotate counterclockwise. A strap wrench is gentler than channel locks if you plan to reuse the spout.
Step 3: Inspect the Stub-Out
This is where most DIYers make their first mistake — they skip the inspection. Shine a flashlight onto the pipe and check for:
- Cracks, burrs, or sharp edges on the copper
- Mineral scale buildup (calcium deposits will prevent a watertight seal)
- The exact distance from the wall surface to the end of the pipe
- Whether the pipe is plumb (perpendicular to the wall) or angled
If you see heavy calcium scale, scrub it with an old toothbrush and white vinegar. Our deep-dive on how to get rid of calcium buildup on a faucet covers safer cleaning techniques if vinegar alone doesn’t cut it.
Step 4: Measure the Gap You Need to Bridge
Hold a ruler against the finished wall and measure how far the pipe protrudes — or how far it sits behind the wall. Then check your new spout’s specs to see how much pipe it needs to grip (usually 1″ to 1-3/4″ for slip-on, or a specific nipple length for threaded). Subtract the actual stub-out length from the required length. The difference is the extension size you need.
Example: Your copper pipe sticks out 1/2 inch past the wall, but your new spout needs 1-1/2 inches of pipe to seat properly. You need a 1-inch extension nipple.
Step 5: Install the Extension Nipple
For threaded copper or galvanized stub-outs, wrap 4–6 turns of Teflon tape clockwise around the male threads of the stub-out (so the tape tightens as you screw on the extension). Hand-thread the brass extension nipple, then snug it with a wrench — about a quarter turn past hand-tight is usually enough. Don’t over-tighten or you can crack a fitting inside the wall.
For copper stub-outs that aren’t threaded, most kits include a slip-fit adapter or a push-on coupling. Follow the manufacturer’s torque spec, and apply Teflon tape only to threaded portions of the kit.
Step 6: Test-Fit the New Spout
Before sealing anything, slide or thread the new spout onto the extended pipe and check the fit. The back of the spout should sit flush against the tile with no visible gap. If there’s still a gap, you need a longer extension. If the spout won’t seat all the way, your extension is too long — swap it for a shorter one. Don’t try to “make it work” with silicone glue; water pressure will eventually win.
Step 7: Seal and Secure
Once the fit is right, run a thin bead of 100% silicone caulk around the back rim of the spout — only on the top and sides, not the bottom. Leaving the bottom open creates a weep channel so any water that does get behind the spout can drain out rather than rot the wall. Press the spout into final position. For slip-on, tighten the set screw firmly but not so hard you dimple the copper. For threaded, rotate clockwise until the spout points straight down and is snug against the wall.
Step 8: Turn the Water Back On and Test
Restore water supply slowly and let the tub run for 30 seconds. Check for drips at the wall, around the spout’s base, and at the diverter (if equipped). Pull up the diverter to send water to the shower head and watch for any leaks behind the spout. Finally, dry the area with a towel and recheck after 10 minutes. A slow leak often only shows after pressure has had time to find a weak seal.
Common Mistakes to Avoid
Even seasoned DIYers trip up on tub spout extensions. Here are the pitfalls we see most often in customer support tickets:
- Over-tightening the spout. Brass and zinc bodies crack easily. Snug, not Hulk-strong.
- Reversing the Teflon tape direction. Wrap clockwise (looking at the threads) so it doesn’t unspool when you screw on the fitting.
- Skipping the silicone bead. Without a weather seal, splash water funnels into the wall.
- Sealing the bottom of the spout. Always leave the lowest 1/4 inch open as a drain.
- Mismatching slip-on vs. threaded. A slip-on spout on a threaded nipple will leak no matter how much tape you use.
- Using putty instead of silicone. Plumber’s putty hardens and cracks; silicone stays flexible.
If your install seems perfect but the spout still wiggles, you may have a related issue covered in our guide on how to tighten a wobbly faucet — many of the same root causes (loose set screws, worn O-rings, undersized nipples) apply.
Finish Options: Matching Your Extension to the Bathroom
While the extension nipple itself is hidden behind the wall, the visible tub spout finish should harmonize with your shower trim, valve handle, and other bathroom hardware. The most common finishes in 2026 American bathrooms:
| Finish | Style Vibe | Maintenance | Best Pairing |
|---|---|---|---|
| Polished Chrome | Classic, bright, transitional | Shows water spots; easy to wipe | White subway tile, glass |
| Brushed Nickel | Warm, soft, hides fingerprints | Very low; gentle soap only | Beige tile, wood vanities |
| Matte Black | Modern, dramatic, on-trend | Avoid abrasives; see our care guide | White or marble surrounds |
| Brushed Gold | Luxe, warm, statement piece | Wipe dry after each use | Navy, emerald, or marble |
| Oil-Rubbed Bronze | Traditional, rustic, warm | Develops natural patina | Travertine, slate, copper |
If you’re considering a darker spout finish, our care article on keeping a matte black faucet looking new is worth bookmarking before you install — the wrong cleaner can dull the coating in weeks. And if you’re rethinking finishes entirely, we also weigh in on whether oil-rubbed bronze is out of style in 2026.
When to Call a Pro Instead
Most tub spout extensions are weekend DIY territory. But there are a few situations where calling a licensed plumber is the smarter move:
- The copper stub-out is cracked, kinked, or leaking inside the wall.
- You need to add length but the pipe ends inside the wall (requires opening the wall).
- You have galvanized pipe with heavy corrosion — fittings may break off when twisted.
- The shutoff valve doesn’t actually shut off (very common in older homes).
- You’re combining the spout extension with a full valve replacement.
A typical plumber service call for this kind of repair runs $150–$350 in most U.S. markets, compared to about $25–$60 for the DIY route.
Maintenance and Longevity Tips
Once your extension is in, a little ongoing care keeps it leak-free for years:
- Wipe the spout dry after use to prevent mineral spotting.
- Inspect the silicone bead every six months and reapply if it shrinks or cracks.
- If your home has hard water, descale the spout’s interior with vinegar every 3–6 months.
- Avoid hanging anything heavy from the spout — diverter handles, shower caddies, washcloths — which can stress the connection.
- If you notice reduced flow, the issue is usually upstream pressure or buildup; see our piece on how water pressure affects faucet flow.
KES Faucet Quality and Standards
At KES, every tub spout and extension we sell is tested to meet or exceed cUPC, NSF/ANSI 61, and AB 1953 lead-free standards. Our solid brass spouts undergo a 500,000-cycle durability test, salt-spray finish testing per ASTM B117, and pressure testing at 2.5x normal household line pressure before any production batch ships. We back every tub spout with a limited lifetime warranty on the finish and mechanical function, so the install you do today should be the last one you do for that fixture.
Author Note
This guide was written by the KES technical content team and reviewed by our in-house product engineers, who collectively hold over 18 years of experience designing and testing residential plumbing fixtures for the North American market. Where we make installation recommendations, we draw from real customer support data, manufacturer torque specs, and Uniform Plumbing Code (UPC) guidelines. If something in your install doesn’t match what’s described here, your specific fixture’s instruction sheet always takes precedence.
FAQ
Can I install a tub spout extension without removing tile?
In most cases, yes — that’s the entire point of an extension. As long as the existing pipe extends at least slightly into the tile opening (or is flush with it), you can thread or slip on an extension nipple without touching the tile. You only need to remove tile if the stub-out is recessed behind the wall surface and you need to add a coupling.
What size tub spout extension do I need?
Measure from the finished wall surface to the end of your existing pipe, then check your new spout’s required pipe-engagement length (printed in its instructions, usually 1″ to 1-3/4″). The extension you need equals the engagement length minus the existing pipe protrusion. Adjustable extensions (1/2″ to 2″) are a safe bet if you’re not sure.
Do I need to solder anything?
No. Modern tub spout extension kits use threaded brass nipples or compression-style slip-on adapters that require no torch work. If your existing rough-in is unthreaded copper and the kit you bought requires soldering, return it and get a slip-on or push-fit kit instead.
How long does it take to install a tub spout extension?
A straightforward swap typically takes 20–30 minutes. Add another 15–20 minutes if you’re cleaning heavy mineral buildup off the stub-out or if you’re upgrading to a different spout style at the same time. First-timers should budget about an hour.
Why is water still leaking behind the wall after I installed the extension?
The three most common causes are (1) missing or improperly wrapped Teflon tape, (2) over- or under-tightened threads, and (3) a cracked extension nipple from over-torquing. Remove the spout, inspect the threads, and reinstall with fresh tape. If the leak is upstream of the extension, you may have a valve issue — check our troubleshooting guide on why your faucet stops working suddenly for related diagnostics.
Can I use a tub spout extension with a diverter (combo tub/shower)?
Absolutely. Diverter spouts install exactly like non-diverter spouts; the only difference is that you’ll want to test the diverter’s pull-up mechanism after installation to make sure water properly routes to the shower head. If water still trickles from the spout when the diverter is engaged, the diverter washer inside the spout is worn — replace the spout rather than trying to repair it.
Is plumber’s putty or silicone better for sealing the spout to the wall?
Silicone, every time. Plumber’s putty is designed for sealing flat metal-to-porcelain joints (like sink drains) and will harden and crack within a year on a vertical tile surface. A small bead of 100% silicone caulk — applied to the top and sides only — gives a flexible, waterproof seal that stays put for a decade.
您好!请登录